You can only edit the signing session for clients who haven't completed their signing.
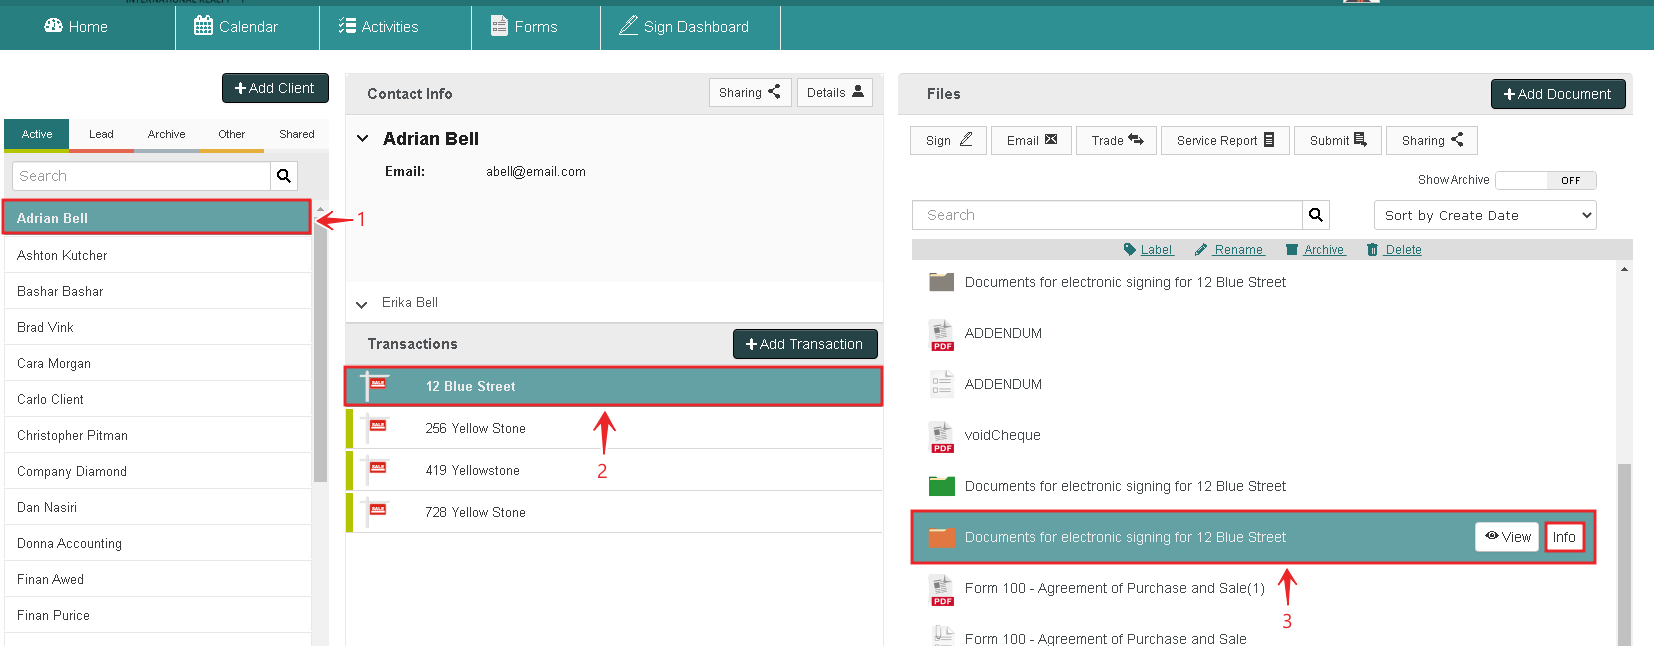
In your NexOne Agent account, select your Client.
Pick a Transaction.
Click on your signing session.
Select the Info Box to the right of the signing session name.

5. Click on Sign Audit to view your signers' progress through the session.
After having sent your signature request, you are still able to edit your signing session. You can edit signers & documents or tags:
Edit Signers & Documents:
- In this area, you will be able to edit your signer’s information: Add / Remove yourself or your clients as a signer, edit Email address, Routing #, Signer type and Password. You can also click Resend next to your client's email address in order to resend them the signature request.
Edit your signature request's Subject and Message.
Edit your documents for signing: Add / remove documents and change documents order.
Adding Signers

In your NexOne Agent account, select your Client
Pick a Transaction
Click on NexOne Sign
You will be redirected to create your Signing Session.

5. In this section, you will be able to add yourself as a signer (only if you need to sign or initial)
6. Also you will be able to add your client as a signer
7. Finally you will be able to add additional Signers (you can use the drop down menu to add existing clients/agents/lawyers).
Removing Signers
If they are the final signer in your signing session removing the signer will complete the signing session. Remaining signers will receive and email with completed documents. If you are getting the final signature in person it may be helpful to remind your electronic signers

Click Edit Signers and Documents.

2. Uncheck the box next to Add yourself as a signer or Add your client as a signer.

3. Once uncheck, click Tag Document for Signature and the uncheck (deselected) signer's tags will be removed. If they are the last signer in the routing order the signing session will close.
All other signers will still receive an email with completed documents. If you need to get another signature, remind client's the session isn't complete.
Edit Tags:
- In this area, you will be able to Add / Remove & edit your Tags. Then Click Send.
To remove any tag, simply drag and drop them outside of the document.
Edit your documents

To place your strike-through tag, click on it, drag it and place it over the undesired text. To adjust the size of your strike-through tag, grab the little white box and resize to the desired size.

2. You also have the option to easily strike-through a whole paragraph by using the "Z" strike-through.

3. To add text to your document, place the text field box wherever you want to make your changes in the document, then input text inside the box. To resize the Text Field box, move the little white box on the corner to adjust its size. You also have the Note option to write notes for your clients or the Highlight option to emphasize your text.
In order to add notes for your clients, please select their names before placing the tag. The notes and highlights will not appear in the completed & signed documents.
Not to be confused with the text used for corrections as, when adding the latter, you should never have a signer selected unless he needs to make changes to the document himself.

4. It is recommended to add your revisions prior to tagging the documents for signatures and initials. Drag and Drop the text field to the desired position. You can also edit the Font Type and Size located at the top right hand-side which will change the font style for all text fields.

5. You can also assign a text field tag to a specific signer, requiring them to fill in the assigned text field. You need to select the signer before placing your tags in this particular situation. The signer's name under the text field box indicates that the text field is assigned to that particular signer.

6. Assign a Check Mark box so your client can add/input selections.
Place your Signatures / Initials

Once all changes have been made to your documents, you can start placing your Tags. At the top of your screen, select the clients for which you want to place your signatures/initials. You can also Multi-Select your clients and drag down one tag which creates a tag for all signers.

2. To add the Date/Time box in your document, you need to select your client and then place it. After your clients have completed their session, the Date/Time box will be populated automatically from their local machine. You can:
Select Time to only have the time;
Select Date to only have the date;
Select Date and Time to have the full date (date and time).

3. Once you have finished placing all your Tags, click Send at the top right hand-side of your screen.